Apache 2.0.59 ကို download ချလိုက်ပါ..
2.2.4 ကိုတော့ download မချနဲ့…
php run လို့မရဘူး…
အရင်ဆုံး IIS ကိုပိတ်ပါ..
ထို့နောက် run တွင် service.msc ကိုrun လိုက်ပါ…
IISAdmin ကို right click -> Stop လုပ်ပါ..
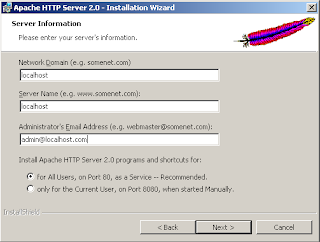
ထို့နောက် Apache ကို install စလုပ်ပါ…
network domain ကို localhost, servername ကို localhost, admin email ကိုadmin@localhost.com လို့ထည့်ပါ..
install သွင်းပြီးလျှင် browser တွင် localhost လို့ရိုက်ထည့်ကြည့်ပါ…
ပြီးသွားရင်တော့ စပြီး config လုပ်ရမယ်…
D:/Localhost/
ဆိုပြီး folder ဆောက်လုပ်ပါ
start->apache HTTP server 2.0.59-> Configure Apache Server -> Edit Apache… ကိုသွားလိုက်ပါ…
DirectoryIndex ကို ဒီလိုပြင်လိုက်ပါ..
# The index.html.var file (a type-map) is used to deliver content-
# negotiated documents. The MultiViews Option can be used for the
# same purpose, but it is much slower.
#
DirectoryIndex index.html index.html.var index.php
နောက်ပြီး
#
# DocumentRoot: The directory out of which you will serve your
# documents. By default, all requests are taken from this directory, but
# symbolic links and aliases may be used to point to other locations.
#
အဲဒါကိုရှာပါ..
သူ့အောက်က DocumentRoot ကို..
DocumentRoot “D:\Localhost”
ပြီးရင်တော့ ဒါလေးထပ်ဖြည့်ပါ…
# If the AddEncoding directives above are commented-out, then you
# probably should define those extensions to indicate media types:
#
ScriptAlias /php/ “C:/php/”
AddType application/x-httpd-php .php
Action application/x-httpd-php “/php/php-cgi.exe”
SetEnv PHPRC “C:/php”
အဲဒါဆိုရင်တော့ ပြီးပြီ…
D:/localhost/index.php ဆိုပြီး create လုပ်…
index.php ထဲမှာ..
<php
phpinfo();
?>
ရေးပြီး save လုပ်ပါ..
ပြီးရင် apache ကို restart လုပ်လိုက်ပါ…
task bar က icon တွေထဲမှာ apache ပါတယ်..
အဲမှာ click လုပ်လိုက်..
Apache2 -> restart ကိုလုပ်လိုက်ရင်ရပါတယ်..
ပြီးရင် IE မှာ http://localhost ကိုရှာကြည့်လိုက်ပါ…
OK ရင်တော့ php info page ကိုမြင်ရပါတယ်..
ဒါလောက်ဆိုရင် OK လောက်တယ်နော်…
PHP config ကိုတော့ ကျွန်တော် အရင်တုန်းကရေးထားတဲ့ php ဆိုတဲ့အထဲမှာ ဖတ်ကြည့်လိုက်ပါ…
PS: Apache သွင်းလို့မရပါက… www.mystseryzillion.com/forum တွင် လာရောက်မေးမြန်းနိုင်ပါသည်


Leave a Reply