
oAuth ဆိုတာကတော့ Open Authorization ကို အတိုခေါ်တာပါ။ token-based authentication system တစ်ခု ဖြစ်ပါတယ်။ oAuth လို့ပြောလိုက်ရင်တော့ ပုံမှန် ကျွန်တော်တို့ အသုံးပြုနေကြ Login with Facebook, Login with google Account တို့ လိုမျိုးပါပဲ။ User က သူရဲ့ username , password ကို third party client ကို ပေးဖို့မလိုပဲ third party client က API ကို သုံးပြီး access လုပ်ခွင့်ပေးလိုက်တာပါ။
Why oAuth
ကျွန်တော်တို့ဟာ client app , website တွေကို user ရဲ့ login username, password တွေကို မပေးချင်ပါဘူး။ အသုံးပြုသူအတွက်လည်း မလုံခြုံပါဘူး။ ဒါကြောင့် user ကို မူရင်း website မှာ လာရောက် login ဝင်ခိုင်းပါတယ်။ ပြီးရင် ဒီ app ကို သုံးမှာ သေချာလား ဆိုပြီး authorize လုပ်ပါတယ်။ အဲဒီ အခါ app ကနေ user information တွေ ရဖို့ အတွက် token လေး တစ်ခု ထုတ်ပေးလိုက်တယ်။ အဲဒီ username,password အစား အဲဒီ token လေးနဲ့ user information တွေ ကို access လုပ်ရပါတယ်။ တကယ်လို့ user က ဒီ webdsite ကို မယုံဘူး မသုံးချင်တော့ဘူး ဆိုရင် access token ကို revoke လုပိလိုက်ရုံပါပဲ။
Login Flow
oAuth မှာ ဘယ်လို login ဝင်လဲ ကြည့်ရအောင်။

User က app သို့မဟုတ် website မှာ Login ကို နှိပ်လိုက်ပြီ။ အဲဒီ အခါမှာ unsplash.com ကို ရောက်သွားမယ်။ Login ဝင်မယ်။ Authorize လုပ်မယ်။ Authorize လုပ်လိုက်တာနဲ့ unsplash.com ကနေ ကျွန်တော်တို့ရဲ့ web/app ကို ပြန်ရောက်လာပါလိမ့်မယ်။ အဲဒီ အခါမှာ access token ပါလာပါတယ်။ access token ရလာပြီဆိုမှ user informaiton ကို ဆွဲထုတ်ပြီးတေ့ web/app ကနေ ပြန်ပြပေးပါမယ်။ တနည်းအားဖြင့် web/app ဘက်မှာ user ရဲ့ login information တစ်ခုမှ မရှိပဲ access token လေး တစ်ခုတာ ရှိပါတယ်။ user ကလည်း အဲဒီ token ကို အချိန်မရွေးပြန်ပြီး revoke လုပ်လိုက်နိုင်ပါတယ်။ တနည်းပြောရင် username,password ပေးလိုက်ရတာထက် ပိုပြီး စိတ်ချနိုင်ပါတယ်။
Register App
အခု ကျွန်တော်တို့ oAuth ကို အသုံးပြုချင်သည့် သူတွေ အတွက် ဘာတွေ လုပ်ရမလဲ ဘယ်လို အဆင့်တွေ ရှိသလဲ ကြည့်ရအောင်။
oAuth ကို အသုံးပြုဖို့ အတွက် App ကို register လုပ်ဖို့ လိုပါတယ်။ အခု ဥပမာ အနေနဲ့ unsplash မှာ app ကို register လုပ်ရအောင်။ Unsplash App ကို သွားပြီးတော့ App ကို register လုပ်ပါ။ User authorization callback URL ကိုတော့ http://localhost/oauth/unsplash.php ထားပေးပါ။ authorization လုပ်ပြီးရင် ဘယ် URL ကို code ပို့ပေးမလဲဆိုသည့် URL address ပါ။ user က authorise ဖြစ်ပြီးပြီရင် http://localhost/oauth/unsplash.php သွားပါဆိုပြီး ဆိုထားတာပါ။ Permission ကိုတော့ အကုန် on ထားလိုက်ပါ။ ကိုယ်လိုသည့် permission ပဲ သုံးလို့ရပါတယ်။ အခုကတော့ demo ဖြစ်သည့် အတွက်ကြောင့် အကုန် on ထားလိုက်ပါ။
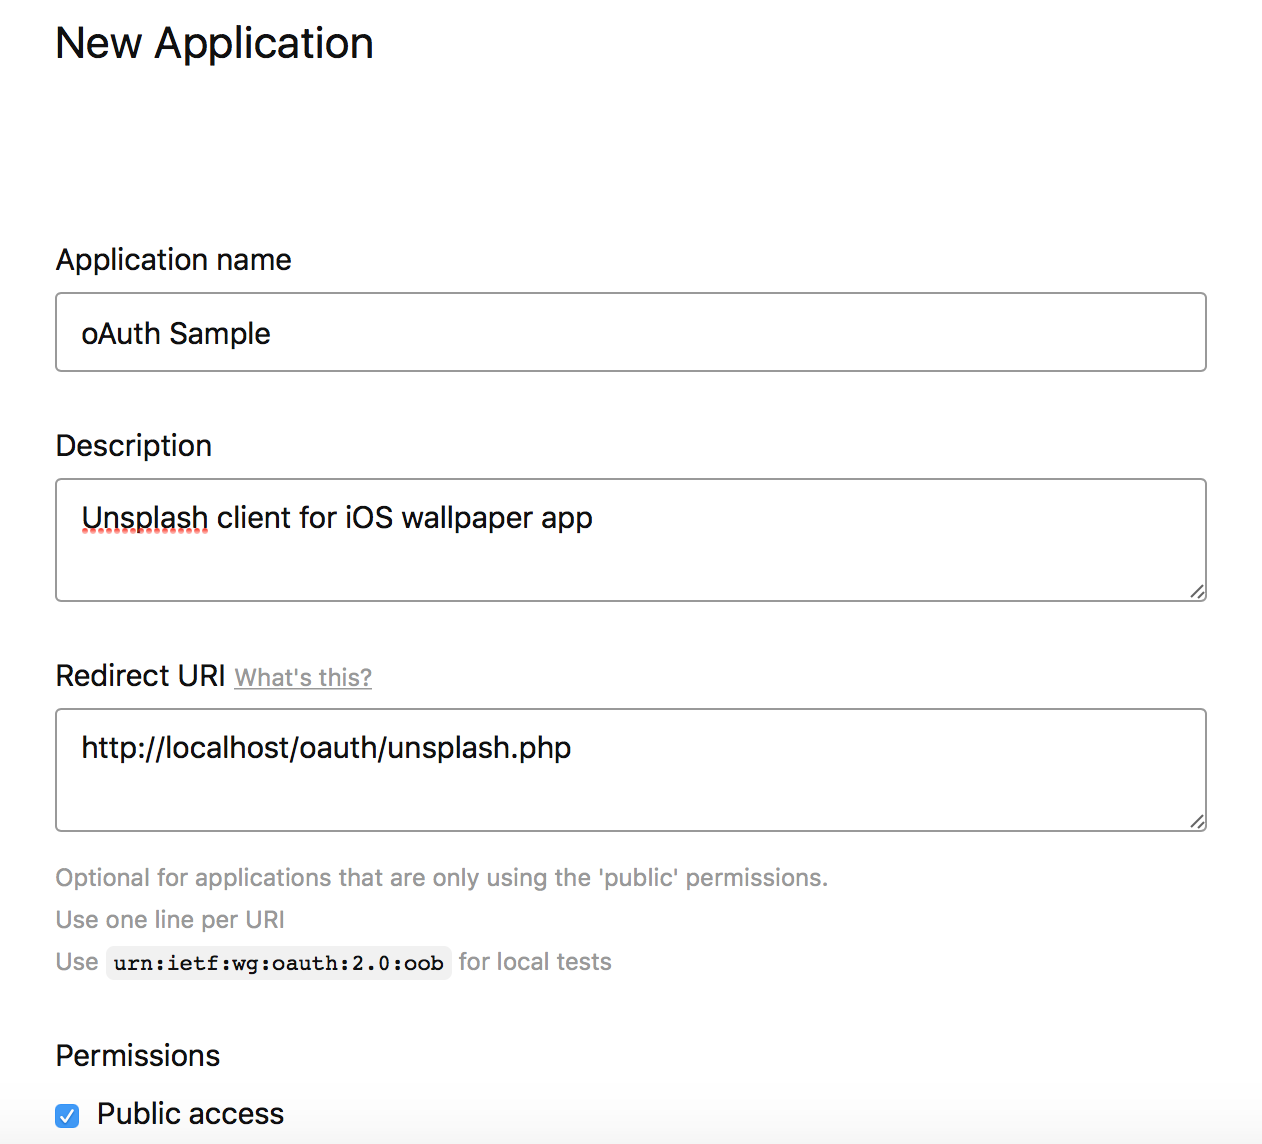
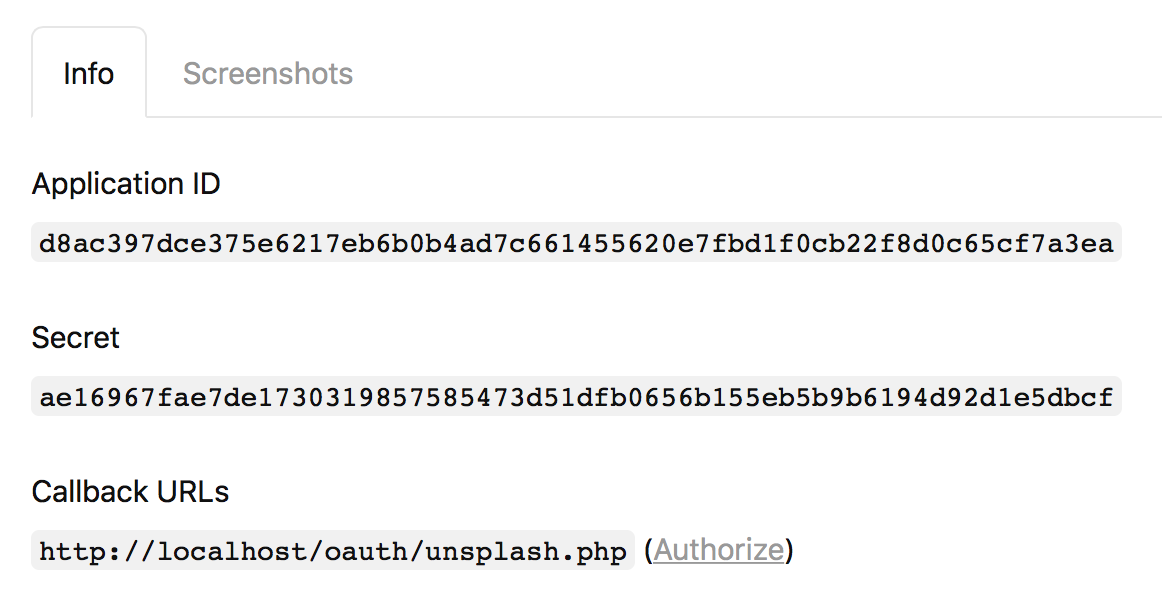
Register လုပ်ပြီးရင်တော့ Info မှာ Application ID နှင့် Secret ရလာပါမယ်။
Request Code
အခု oAuth အတွက် စပြီး ရေးကြည့်ရအောင်။ oAuth အတွက် ဒီမှာ ရေးထားတာကို အရင် ဖတ်ကြည့်ပါ။
https://unsplash.com/oauth/authorize
အဲဒီကို
| Param | Description |
|---|---|
| client_id | Application ID |
| redirect_uri | register လုပ်တုန်းက ထည့်ထားသည့် authorise url |
| response_type | code ဆိုပြီး ထည့်ရန် |
| scope | request scope ကို ထည့်ရန်။ အခု ကျွန်တော်တို့ scope ကို မသုံးပဲချန်ထားခဲ့ပါမယ်။ |
GET နဲ့ ခေါ်ရမှာ ဖြစ်တာကြောင့်
https://unsplash.com/oauth/authorize?client_id=d8ac397dce375e6217eb6b0b4ad7c661455620e7fbd1f0cb22f8d0c65cf7a3ea&redirect_uri=http://localhost/oauth/unsplash.php&response_type=code
သူပေးထားသည့် document က အတိုင်း ကျွန်တော်တို့ တွေ ခေါ်လိုက်ပါပြီ။
authorize လုပ်ပြီးရင် redirect_uri ကို callback နဲ့ ပြန်လာတာကို တွေ့နိုင်ပါတယ်။

http://localhost/oauth/unsplash.php?code=1d60a889a02009f89e079f02ad988934beadf7d8c1d86d28021765eb304a5d0e
Request Token
အခု access token ကို ရဖို့ရလာသည့် code ကို ပြန်ပို့ပေးရပါမယ်။
POST https://unsplash.com/oauth/token
| Param | Description |
|---|---|
| client_id | Application ID |
| client_secret | Application secret |
| redirect_uri | register လုပ်တုန်းက ထည့်ထားသည့် authorise url |
| code | unsplash ကနေ ပြန်လာသည့် code |
| grant_type | authorization_code ဆိုပြီး ထည့်ပေးရပါမည် |
POST နဲ့ ခေါ်ရမှာ ဖြစ်သည့် အတွက်ကြောင့် website ကို ဖွင့်ဖို့ မလိုအပ်ပဲ curl နဲ့ ခေါ်ဖို့လိုအပ်ပါတယ်။
if (isset($_GET['code'])) {
    //try to get access token
    //POST https://unsplash.com/oauth/token
    //required
    //client_id
    //client_secret
    //redirect_uri
    //code
    //grant_type = authorization_code
    $data = [
        'client_id' => $appId,
        'client_secret' => $appsec,
        'code' => $_GET['code'],
        'redirect_uri' => 'http://localhost/unsplash/index.php',
        'grant_type' => 'authorization_code'
        ];

    $url = "https://unsplash.com/oauth/token";

    $handle = curl_init($url);
    curl_setopt($handle, CURLOPT_POST, true);
    curl_setopt($handle, CURLOPT_POSTFIELDS, http_build_query($data));

    //disable SSL because of testing in localhost
    curl_setopt($handle, CURLOPT_SSL_VERIFYPEER, false);

    curl_setopt($handle, CURLOPT_RETURNTRANSFER, true);
    $response = curl_exec($handle);


    if (false === $response) {
        echo curl_error($handle);
        echo "<br/>";
        echo curl_errno($handle);
        exit;
    }

    curl_close($handle);

    var_dump($response);
    $json = json_decode($response,true);
    echo $json["access_token"];


}
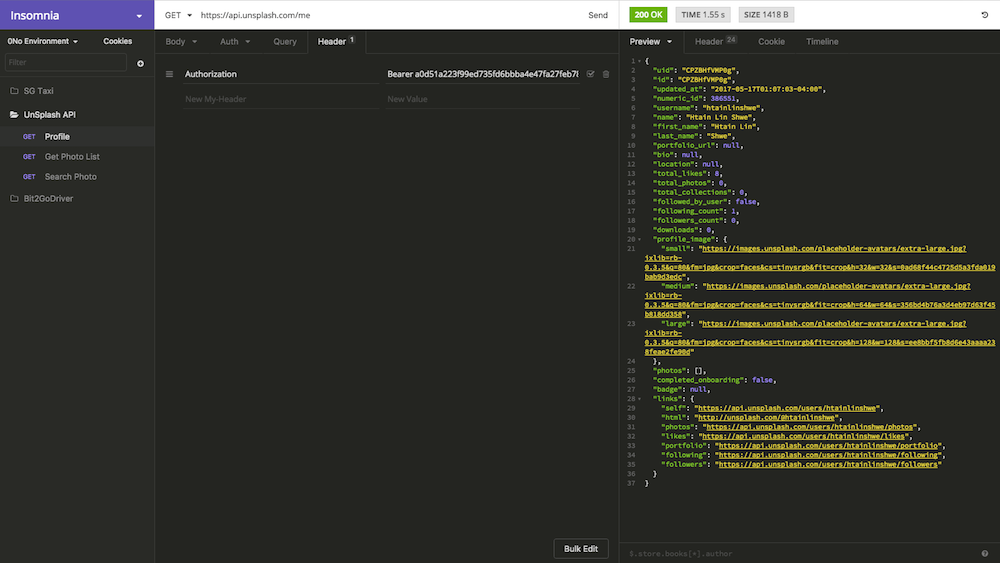
အခု ဆိုရင်တော့ access_token ရလာပြီ။ Access token ရလာရင် Header မှာ Authorization ဆိုပြီး ထည့်ပြီးတော့ request တွေ ခေါ်လို့ရပါပြီ။
Authorization: Bearer ACCESS_TOKEN
ကျွန်တော်တို့ post man သို့မဟုတ် insomnia ကို အသုံးပြုနိုင်ပါတယ်။
အခုဆိုရင်တော့ user က သူ့ရဲ့ username နှင့် password ကို third party client ကို မပေးပဲ third party client က user ကို access လုပ်လို့ရပါပြီ။
User က မကြိုက်ဘူးဆိုရင် ပြန်ပြီး revoke လုပ်ရုံပါပဲ။ Unsplash အတွက် ဆိုရင်တော့ https://unsplash.com/oauth/authorized_applications မှာ သွားပြီးတော့ revoke ပြန်လုပ်နိုင်ပါတယ်။
Leave a Reply